Unbroken v0.5.162 - Ship Modules
Dev Diary: Update 5
“Good morning, pilot!
It’s Chris again. We got rid of our old spacecraft suppliers. It took them ages to deliver and it was near impossible to tweak certain parts of a ship for maximum performance. The new contractors are much more flexible since they build their ships in autonomous modules. This makes it much easier (and of course much cheaper) for us to replace defective parts or boost a single module, if necessary.
As an added benefit, they seem to invest in a new factory facilitating much bigger ship designs. This could mean, that we will be able to order Frigate-sized ships in the near future. Management even considers investing or even outright buying and incorporating them in our organization. I don’t really care, as long as they can keep up delivering premium-quality ships.”
Christopher Redborough, Head of Engineering, Unbroken Organization
Release Notes
Gameplay
- ships consist of multiple modules
- drive modules affect the ships speed and maneuverability
- hull modules increase the ship’s HP
- weapon modules vary in fire rate, projectile speed, range and damage
- each ship has a ship category, defining its
- base HP, not counting hull modules (bigger ships => more base HP)
- maximum number of ship modules (bigger ships => more modules)
- speed and agility debuffs (bigger ships => slower, less agile)
- quit game via Escape Key
Content Update
- new drive modules:
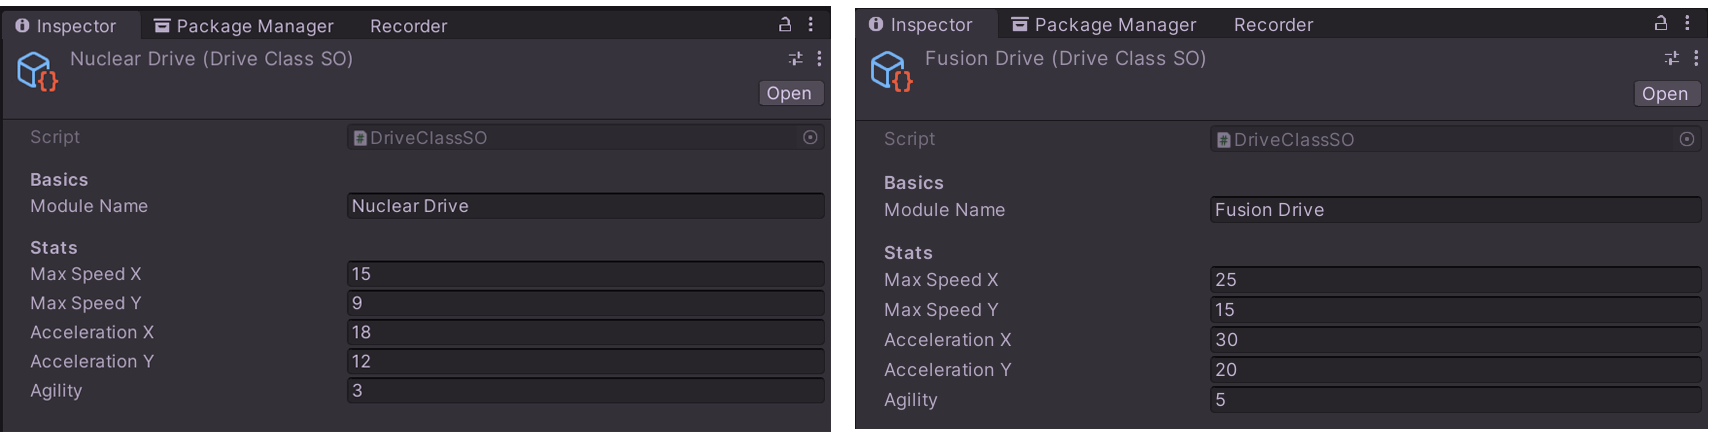
- Nuclear Drive (basic)
- Fusion Drive (advanced)
- new hull modules:
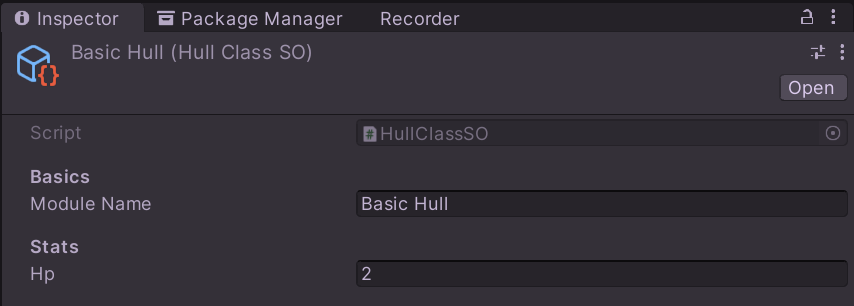
- Basic Hull
- Strong Hull
- new weapon module:
- AutoCannon (high fire rate, low damage)
UI
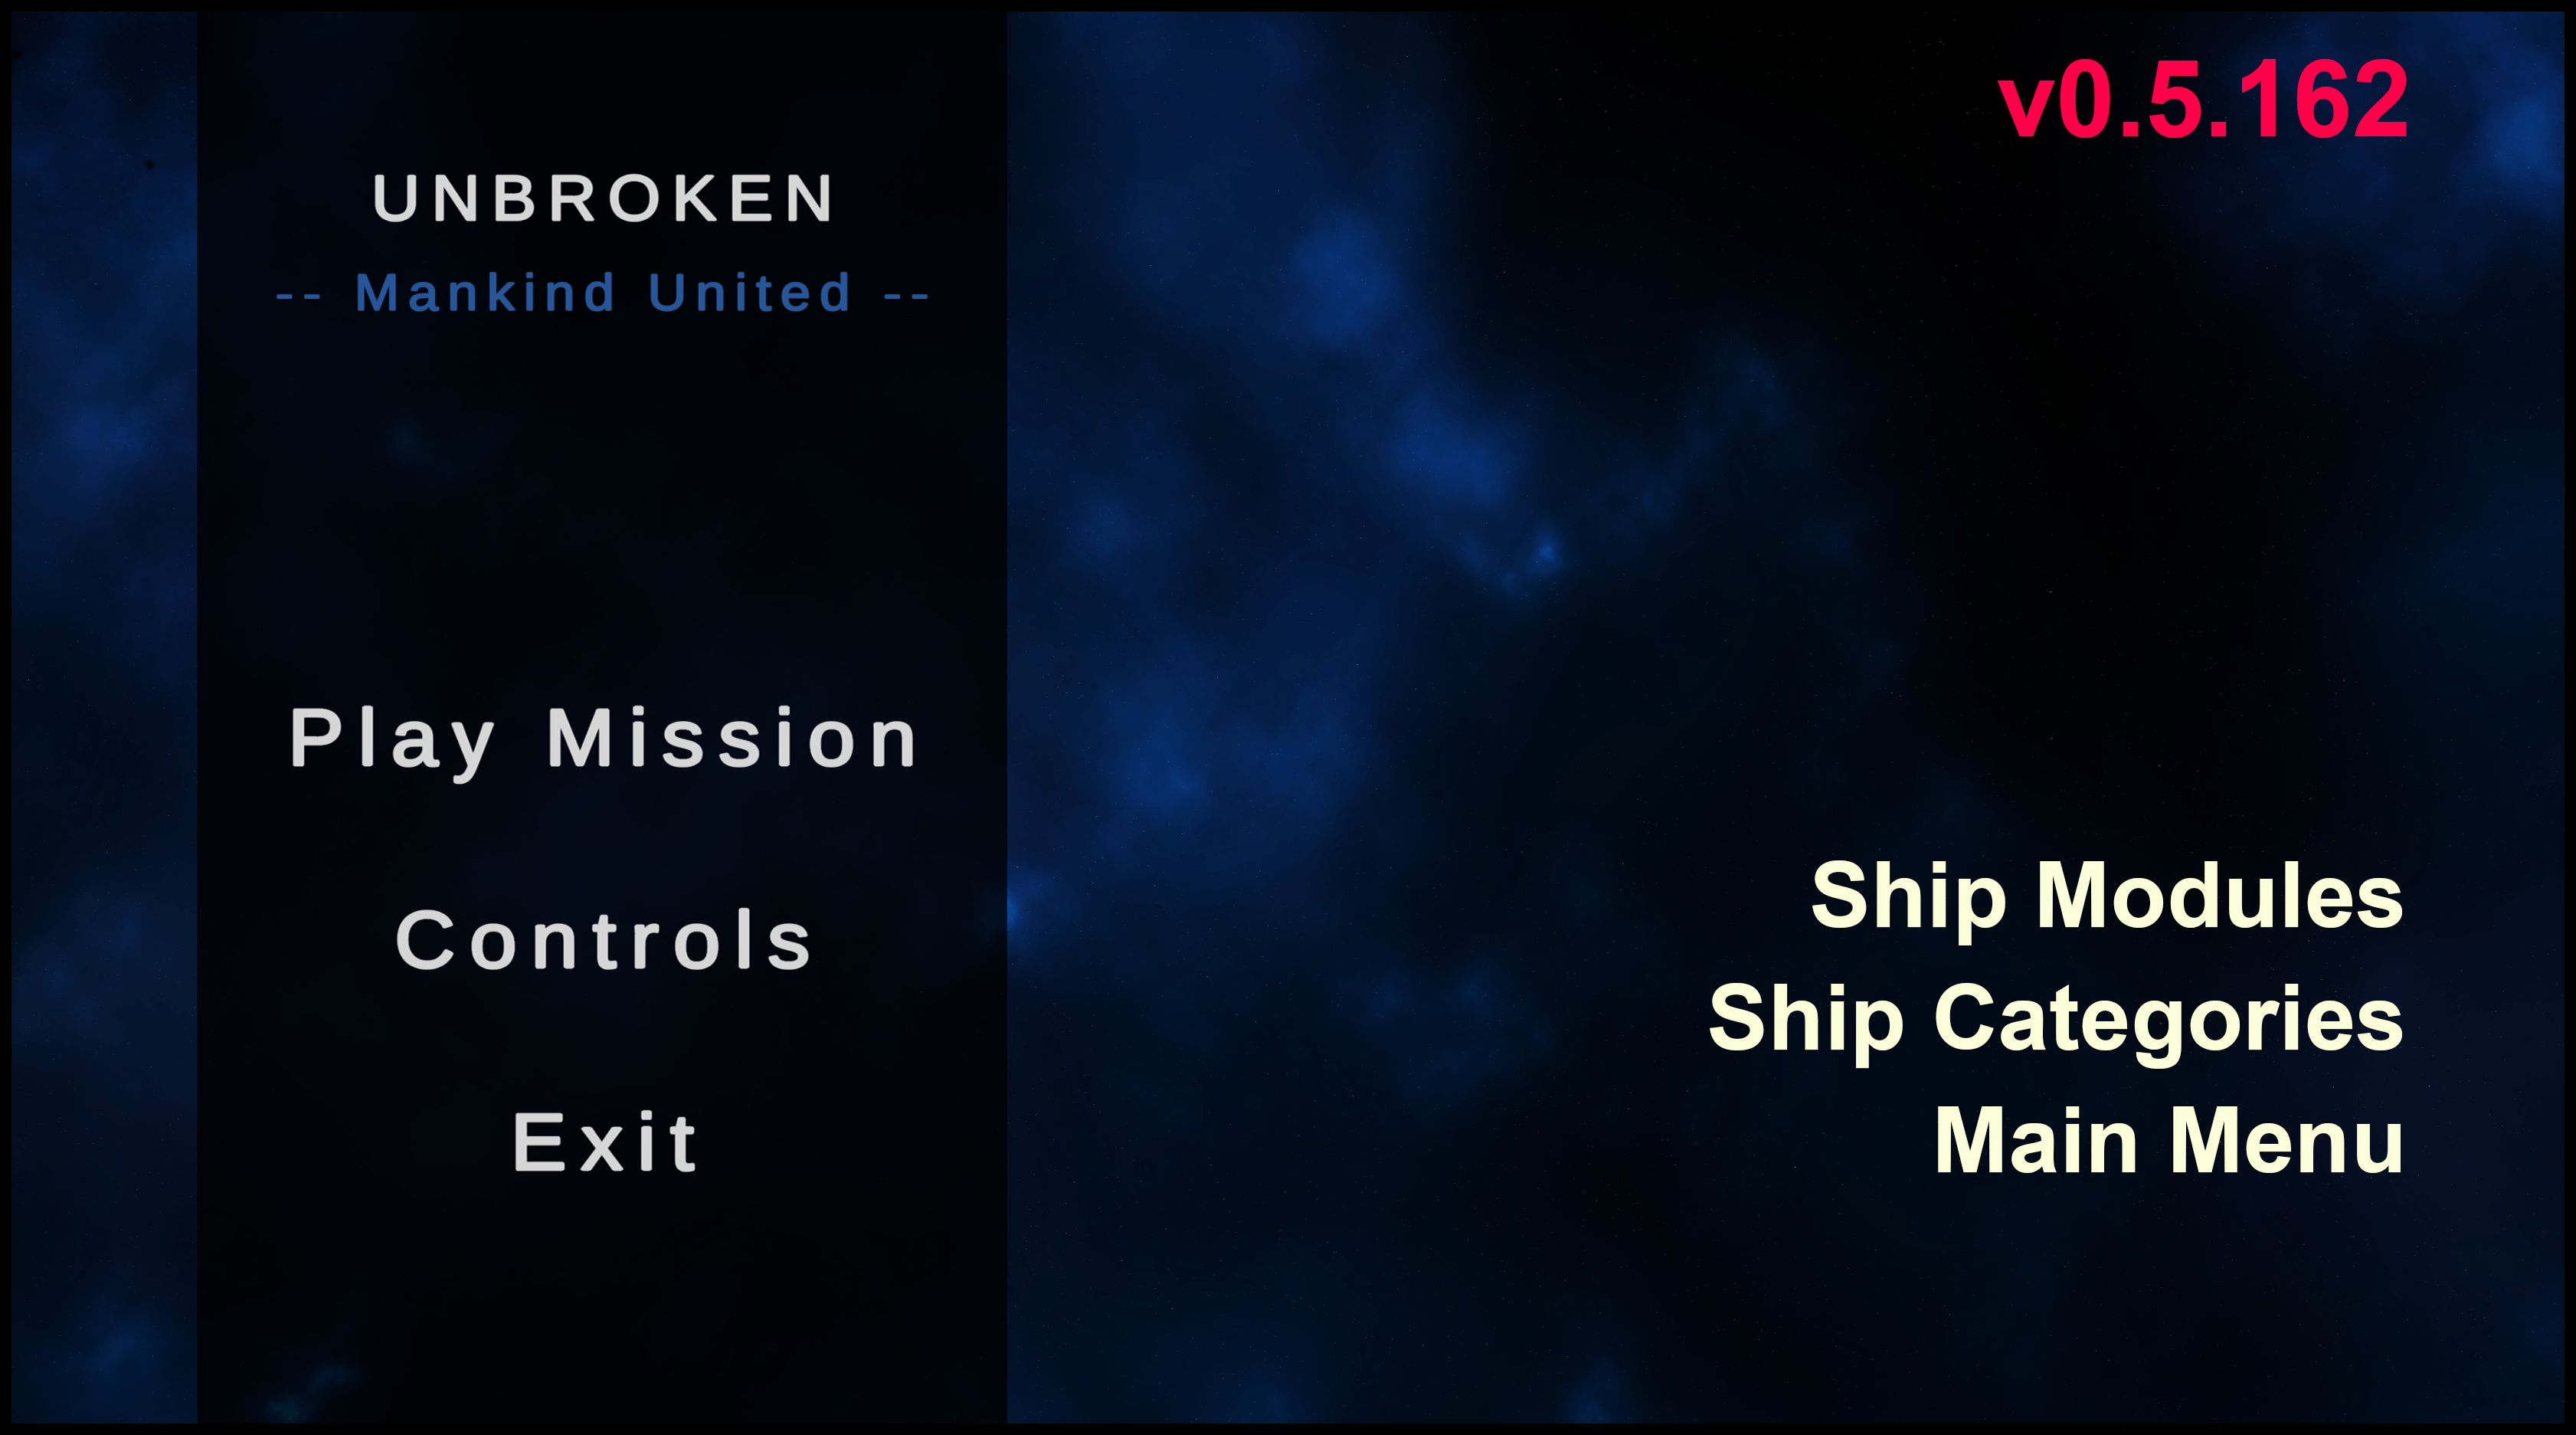
- Main Menu
- the game now has a main menu
- play menu shows all equipped ship modules
- controls menu displays the keyboard controls
Tech Talk
Ship Modules
Several game modes are planned for future versions of the game:
- The StandardMode will allow the player to spend a limited amount of resources to build a ship design
- The ChallengeMode will confront the player with predefined ship designs, providing a certain challenge
- The FreestyleMode will allow the player to fully customize his ship without any restrictions
- There might be another mode (but that will be kept a secret for now)
For all of these modes to be feasible, swapping ship modules in the game must be as easy and straightforward as swapping pieces of LEGO. The long-term goal of the modular ship building system is to be able to change every aspect of a ship without having to write new code. This means:
- the game must be able build ships via scripts, following certain rules or satisfying certain limitations
- the player must be able to drag and drop ship modules to customize ship designs
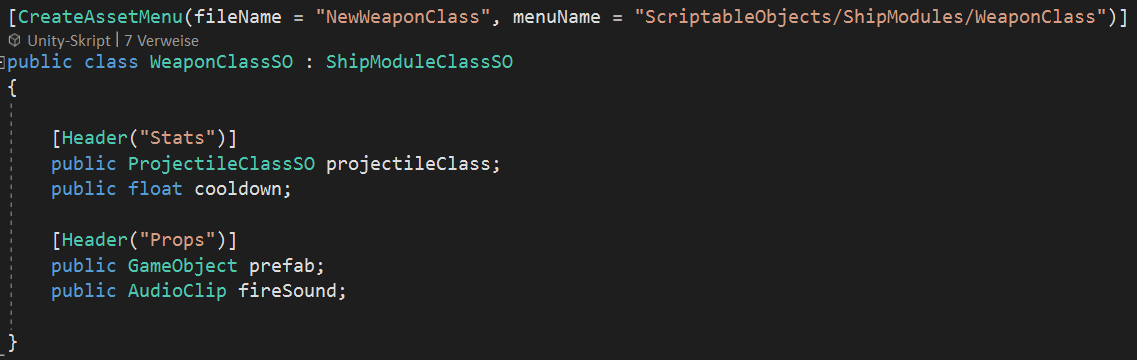
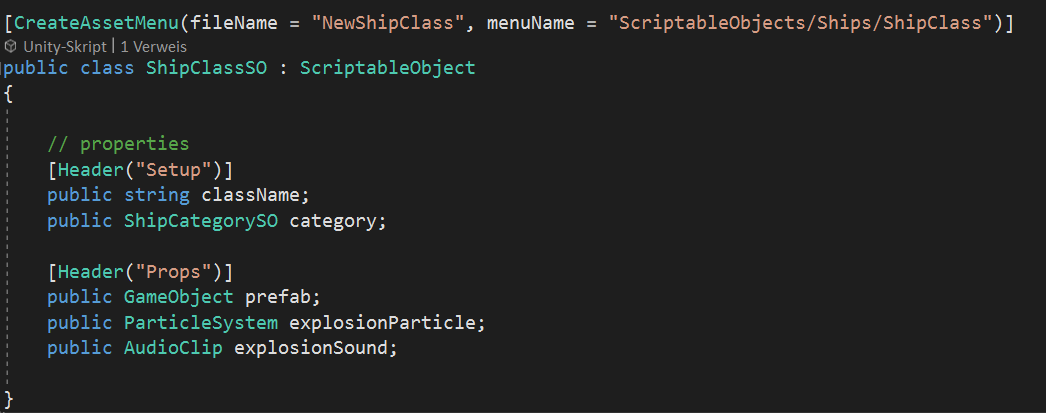
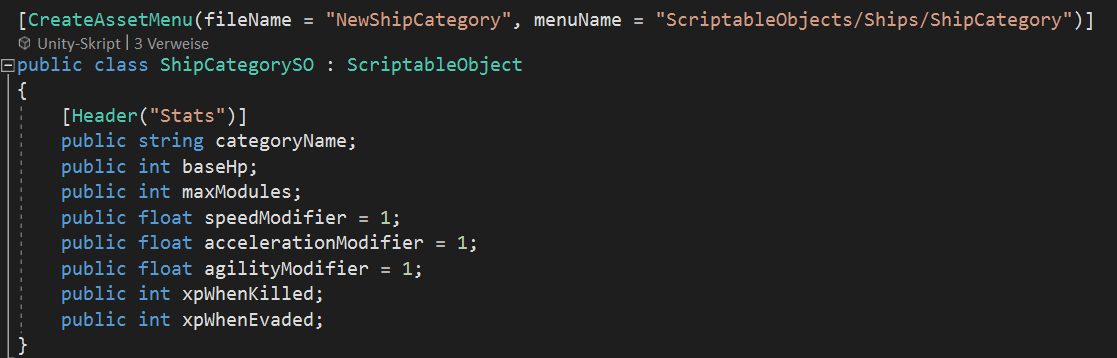
Since ShipModules will mostly hold data, we create a new abstract ShipModuleSO (For details about ScriptableObject, have a look at Update 5). Its only variable at the moment is the module name. This will be the base class for all types of ship modules to emerge. For now, we only have Drives, Hull and Weapons.
Let’s start with Drives. Until now, parameters like speed, acceleration and agility are tied to the ship class. As long as that doesn’t change, we won’t be able to upgrade ships to go faster or get better agility. Thet’s why we move these parameters from our ShipClassSO into a new DriveClassSO.
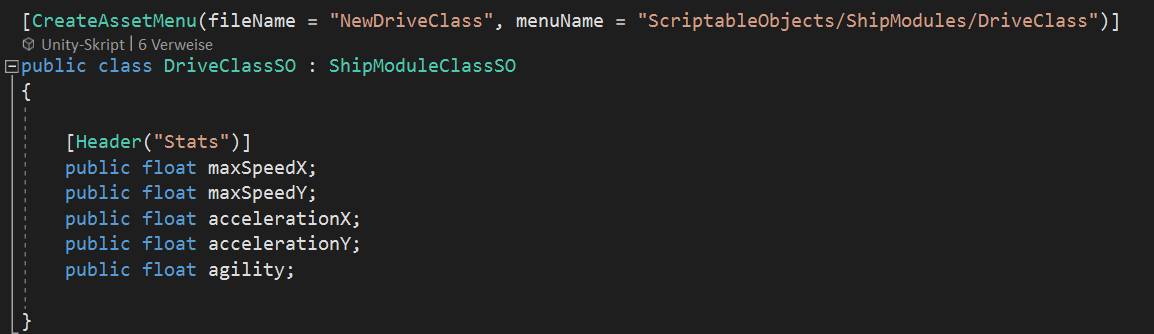
We create Nuclear Drive and Fusion Drive assets from DriveClassSO.
Hull modules are supposed to increase the HP of a ship. Pretty simple!

A single Basic Hull asset should be enough for now.
For Weapons, we can pretty much take our Weapon class from before and just turn it into a ScriptableObject.
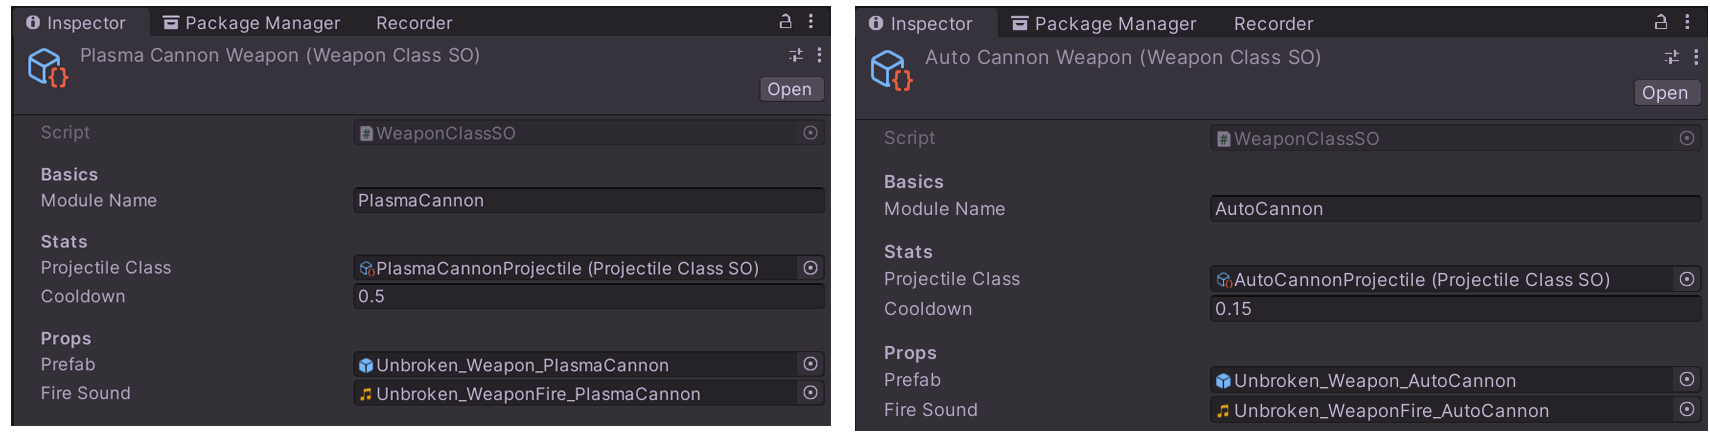
We create a PlasmaCannon for the Aliens and an AutoCannon for the player.
If you are wondering, why there is no damage, projectile speed or range defined for a weapon, no panic! These parameters depend on the Projectiles being used and are therefore encapsulated within the ProjectileClassSO. Although there is but one projectile class for each weapon class at the moment, we could add new projectile classes easily and assign them to different weapon classes.
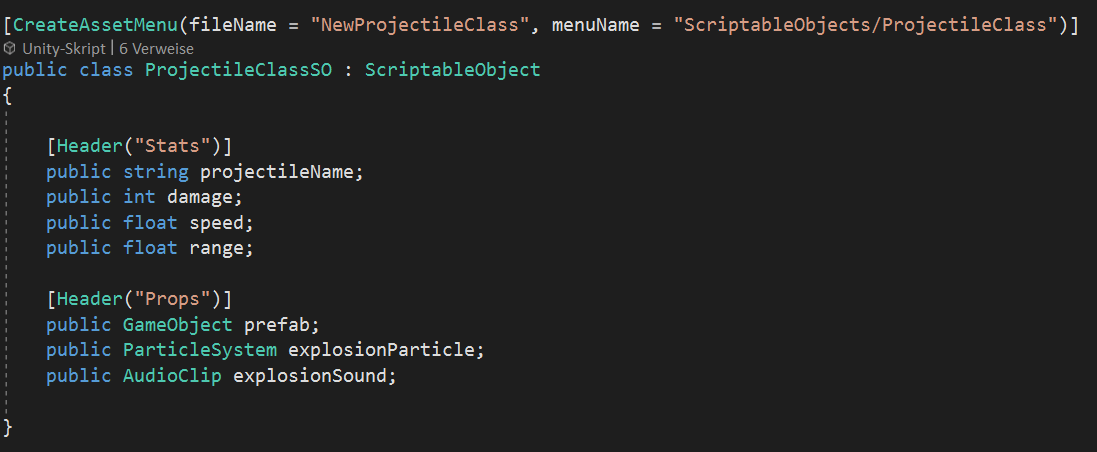
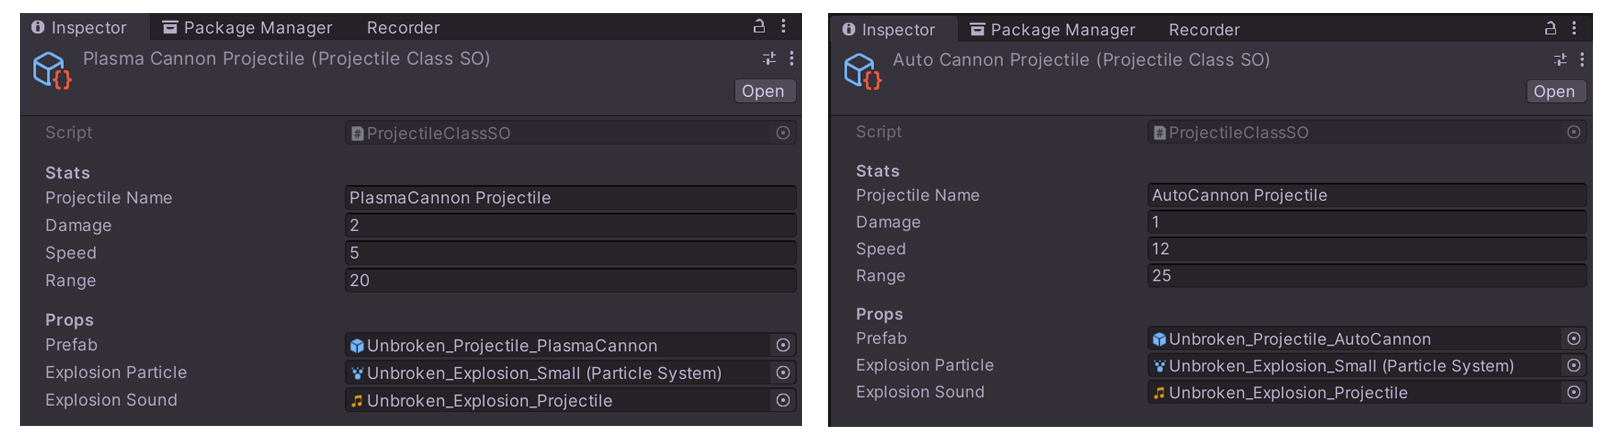
For completeness, let’s have a look at the PlasmaCannon projectile and the AutoCannon projectile as well.
We have successfully created all of our module classes and moved a lot of variables out of our ShipClassSO. As a result, it looks pretty naked. Only the class name, the ship image, the explosion particle effect and the explosion sound are left. You might have spotted the new ShipCategorySO as well. But we’ll talk about that later. What is left now is pretty basic stuff, which we do NOT need to modify via ship modules. So we are done here.
But now that all of these variables have moved out of the ShipClassSo into the several modules, how would we assign these modules to a concrete ship instance? For that purpose, we need a new ScriptableObject called ShipDesignSO. A ship design is a concrete ship configuration or a ship build or however you would call a ship blueprint of a certain class with a certain set of modules installed.
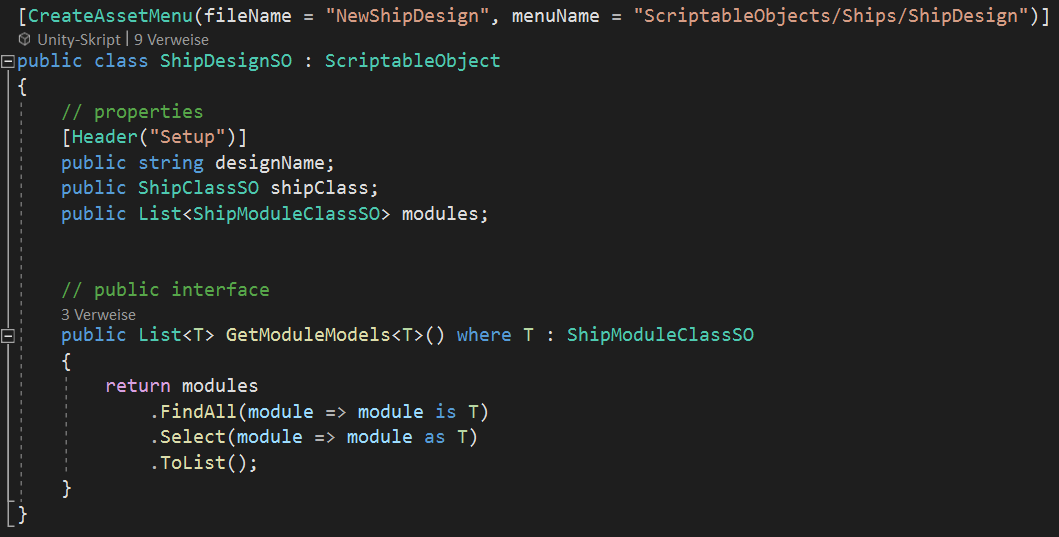
You might be wondering, why this ScriptableObject defines a method. Didn’t we learn, that ScriptableObjects are mere data containers? Well, no. It is correct, that ScriptableObjects are perfect for storing data and that they are not suited for modeling behavior. But that doesn’t mean, that they shouldn’t contain code. They are called “Scriptable” Objects for a reason. Without the method, each script trying to find only certain types of modules within a ship design, would have to implement a function with the respective search logic. It is much better to centralize this task and provide it as a utility function directly from within the ScriptableObject. Now every script can politely ask the ShipDesignSO for a list of modules of a specific type, i.e. only the weapon modules.
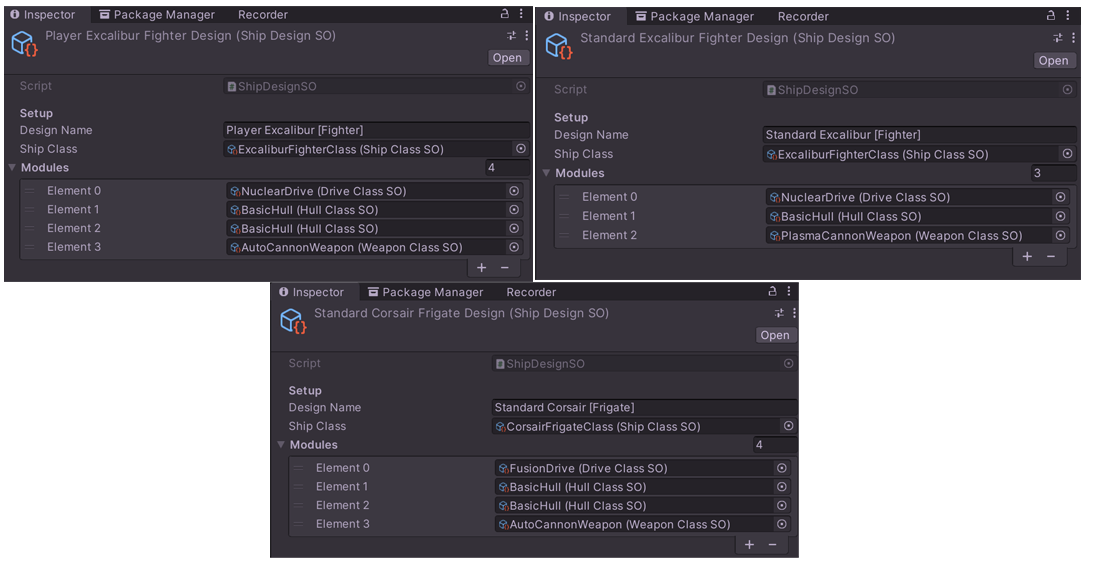
With the ShipDesignSO ready, we can create assets for all different ship designs we need. One for the default alien ship, one for the player ship and one for the boss in the last wave. Note, that the default alien ship and the player ship have the same ship class “ExaliburFigher” but the player ship has an additional hull module, in order to add some HP and keep the difficulty at a lower level in the first mission. The boss however received the “CorsairFrigate” ship class.
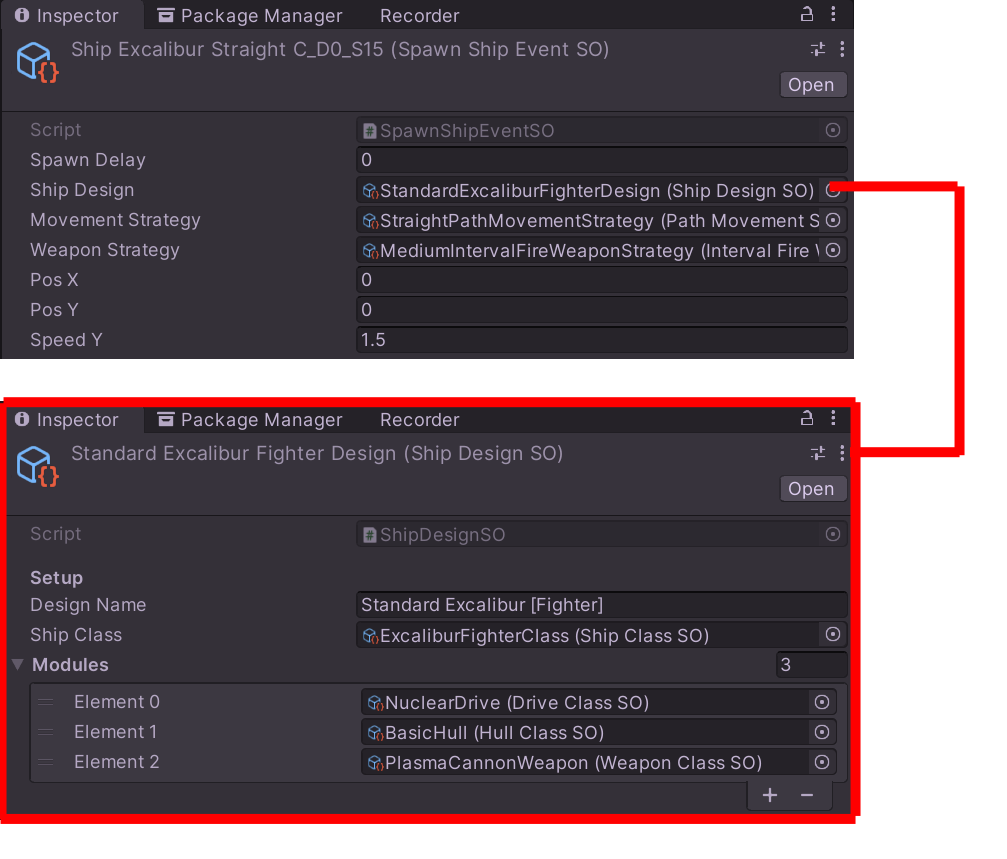
Finally, we need to update our SpawnShipEventSO. Until now it spawned ships of a certain ShipClassSO. But that is not specific enough anymore, since the class doesn’t say anything about drives, hulls and weapons. The only change we have to apply is feeding the SpawnShipEventSO with a ship design instead of a ship class.
Afterwards, we adjust our SpawnShipEvent assets by assigning a ship design. For example, in the first wave, there is a formation using the SpawnShipEvent presented below (Excalibur ships, that run along a straight path with the “StandardExcaliburFighterDesign” which contains a NuclearDrive, a BasicHull and a PlasmaCannon.
Our first goal is achieved. From now on, we can create different ship designs from all available modules without writing any more code. Creating more drives, hulls or weapons is also just a new asset file away. The ability to build ship designs via drag and drop in the UI will be the task of another day.
Ship Categories
While ship classes define a certain ship type (similar to a car model), ship categories are an indicator for the size and mass of a ship (similar to the categorization: compact car, estate car, van, truck). A lot of properties are common across all ship classes of a certain ship category. In order to avoid duplication, we create a new ShipCategorySO.
The bigger the ship,
- the more base HP it will have (even without extra hull modules)
- the more modules will fit into the ship design
- the slower and less agile it will be (this can be countered to a certain degree with better drives)
- the more XP the player gets for destroying (or evading) it
For now, we only have
- the Figher category (very small and fragile, but agile)
- the Frigate category (medium sized ship with lots of base HP and more space for modules)
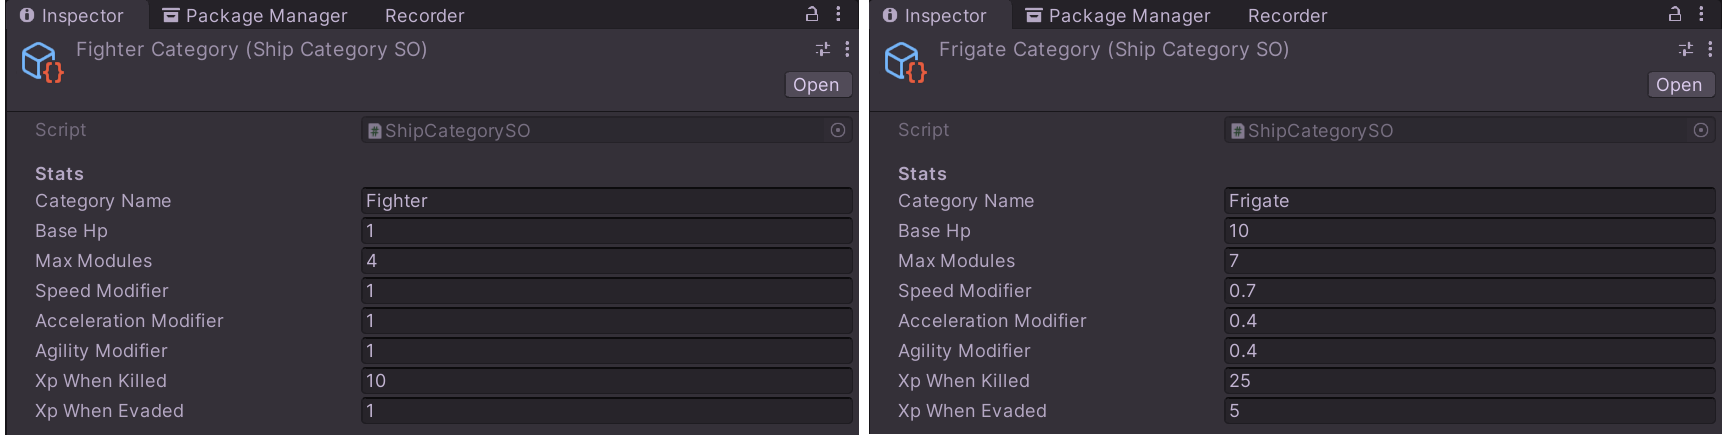
You might have noticed, that the boss ship is a frigate and can have up to 7 modules, but actually has only 4 equipped. This just means, that in the first mission, the aliens do not use their full potential yet. Frigates in later levels will be even harder to take on.
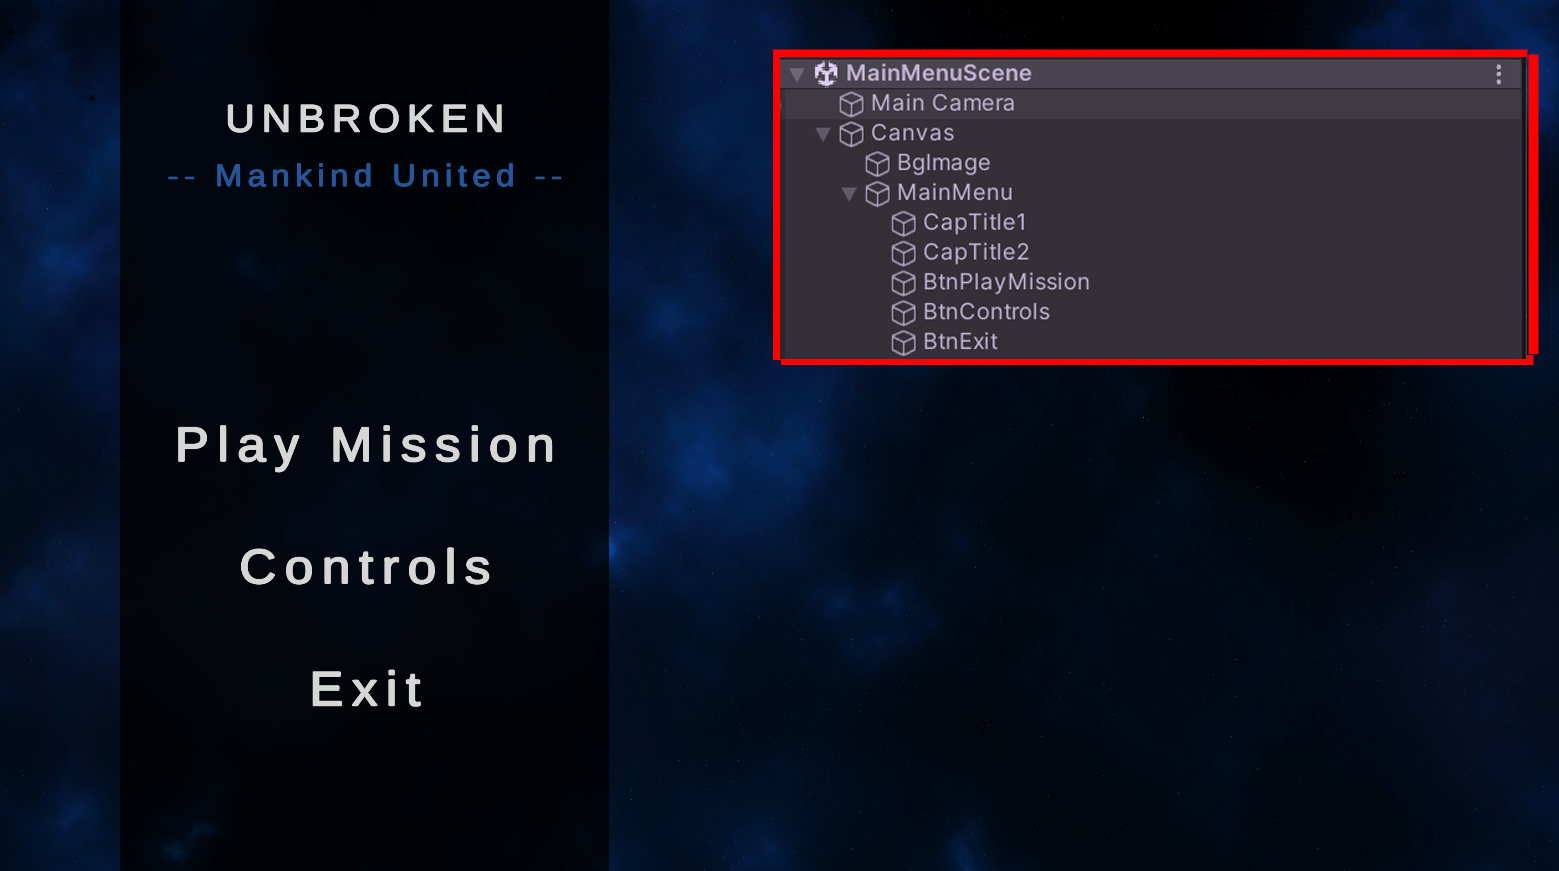
Building the Main Menu
Remember how we built the HUD in Update 4 of the Dev Diary? Well, since HUD elements and menus are both just pieces of UI there will be lots of similarities.
The major difference is, that the main menu will live in another Scene. Consider scenes to be the levels of a game. So we could and probably will build a scene for each mission in the game. But the main menu shouldn’t be part of any single mission, but instead it should be shared among all of them. Providing a separate scene for the Main Menu will help.
Within the MainMenuScene, as before, we add UI elements like a background image, panels, text fields and buttons to a Canvas.
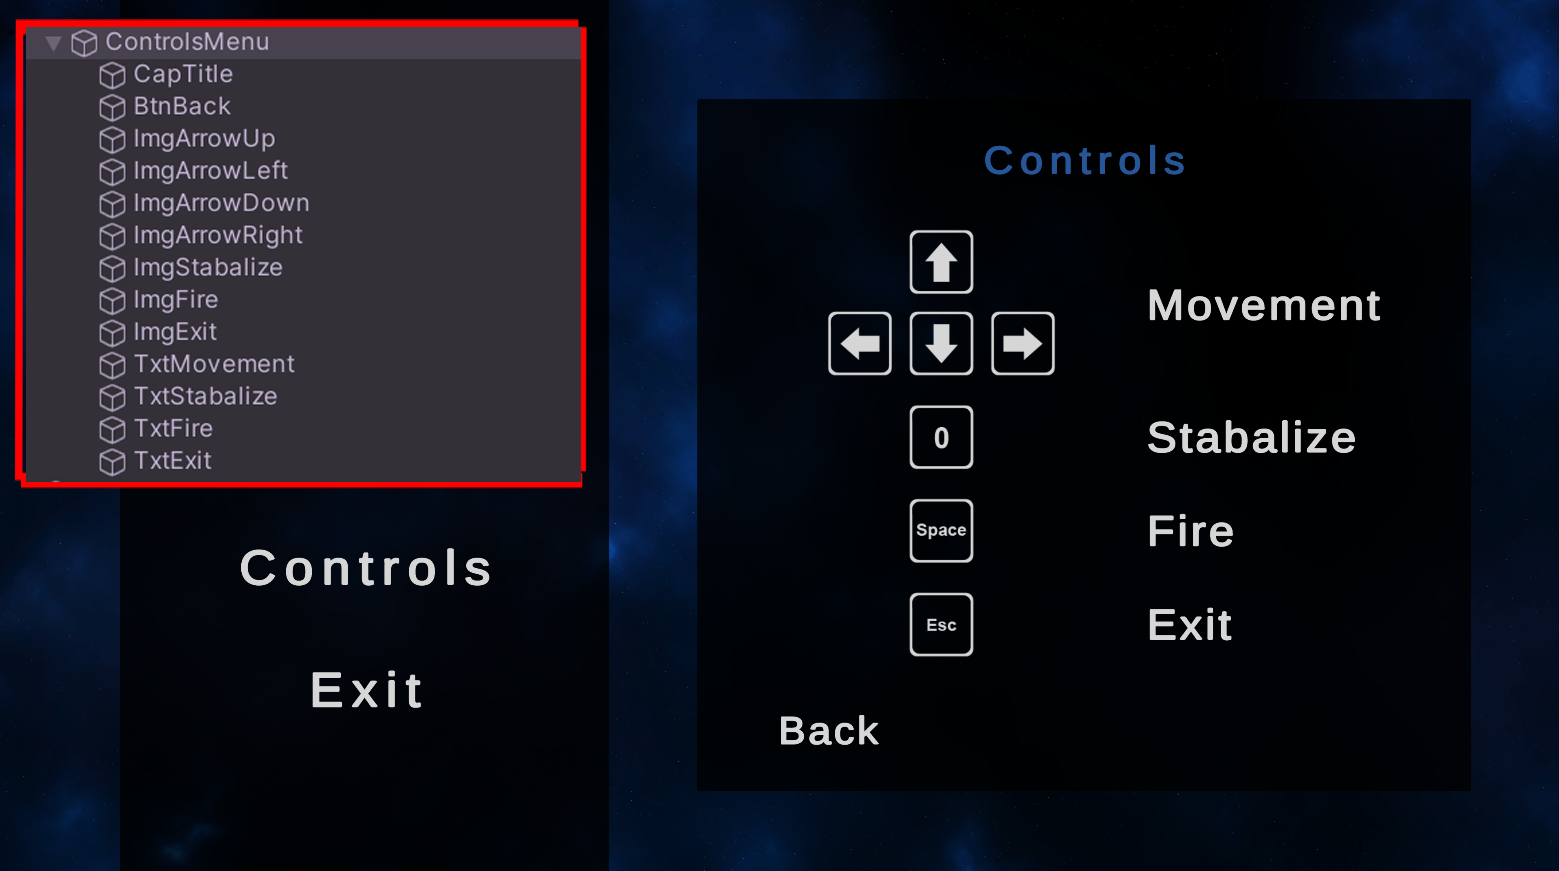
For the “Controls” sub menu, we need images of some keyboard keys to display. I am weary of looking for free assets on the internet and it is not very demanding to draw some keyboard keys, so I’ll take the time to build the assets myself. Let’s deactivate the “Controls” sub menu to make sure, it is displayed only if the player uses the respective main menu option.
For the “Play Mission” sub menu, things are a little bit more complicated. We will keep this sub menu active. That way it is already displayed per default when starting the game and we can jumpt into the game right away.
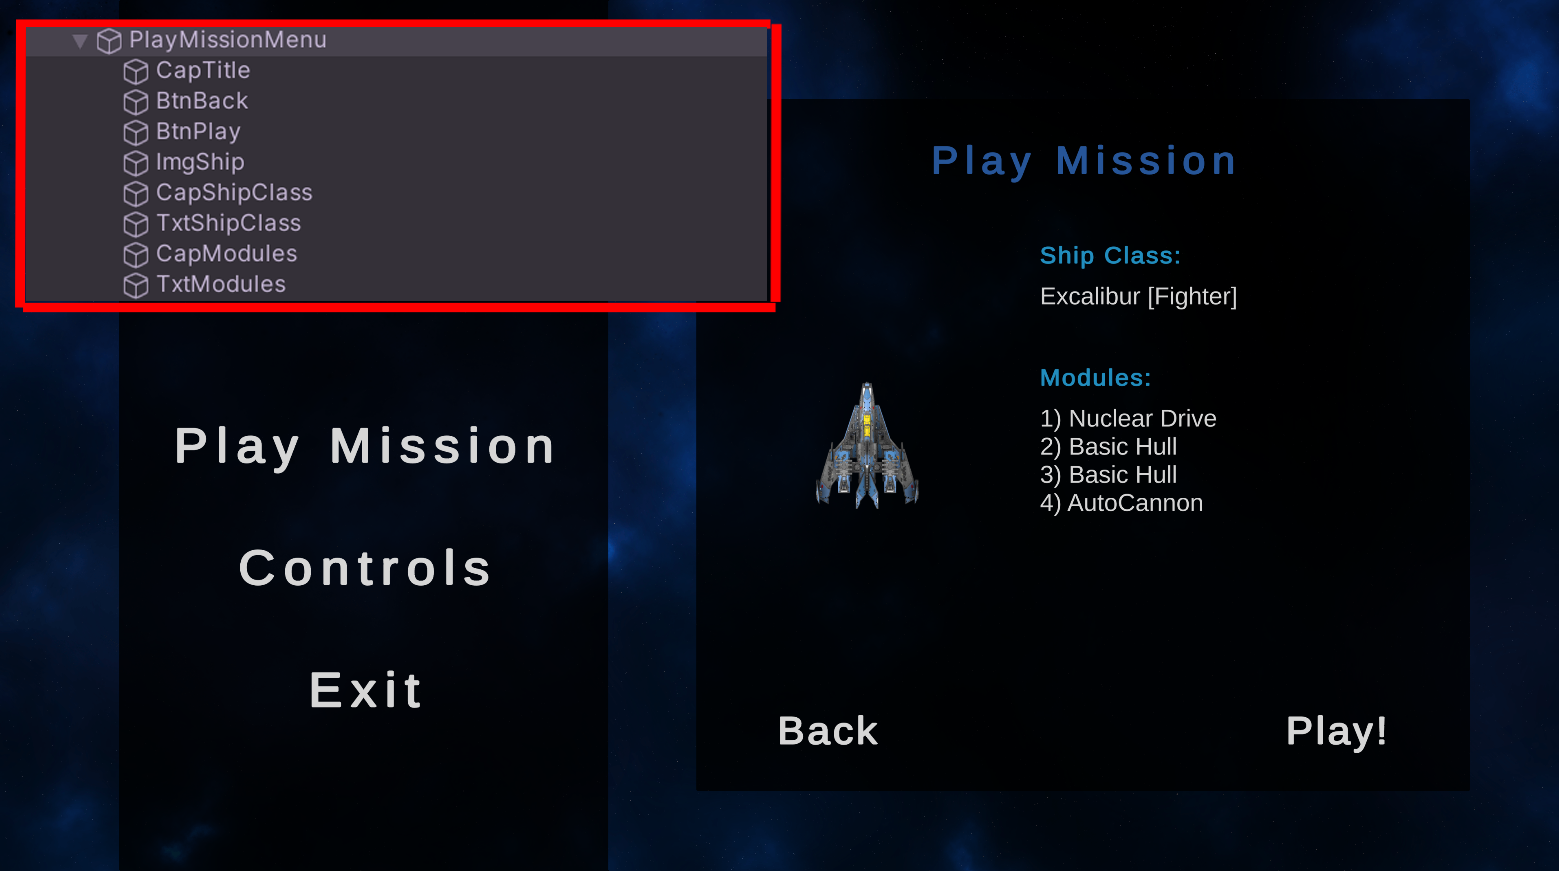
Since we don’t just display static images and text here, but the ship class and the equipped modules of the player ship, which might vary from session to session, we need to read the actual player ship design from the actual game data.
For that purpose, we attach a new PlayMissionMenuController (MonoBehavior) script to the sub menu. The script exposes a variable of type ShipDesignSO to the Inspector. That way, we can inject the player ship design into the script. Within the scripts Start() method, we:
- load the ship graphic and ship class name from shipDesign.shipClass
- load all modules from shipDesign.modules and display them in a list
Now, we need to make sure, the game switches to the MissionScene, when the player hits the “Play!” button. That’s easy. We just create a public method called OnPlay() in the PlayMissionMenuController script, which loads the MissionScene via Unity’s SceneManager (nothing we have to code ourselves). In the Inspector, we select the “Play!” button and configure, that when the button is clicked, it shall execute the OnPlay() method of the PlayMissionMenuController script.

We have all our menus ready, but how can we instruct the menu buttons to activate or deactivate the sub menus? We don’t even need to write code for that. In the Inspector we can configure the Main Menu buttons to
- deactivate a submenu by using the command GameObject.SetActive() and not setting the check mark or
- activate a submenu by using the command GameObject.SetActive() and setting the check mark
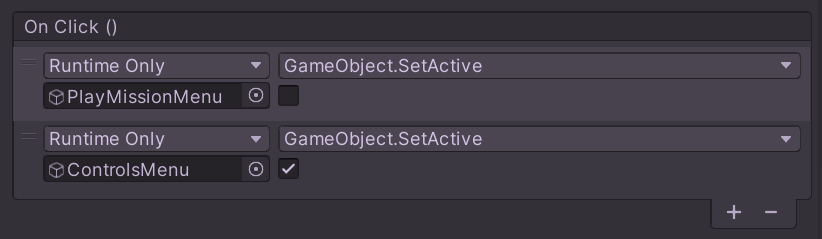
This logic will be executed whenever we click on a Main Menu button. We can use the same process to hide a sub menu, when pressing the back button within that sub menu.
That’s it for today. See you next time!
Leave a comment
Log in with itch.io to leave a comment.